
Resources
Timing the Model A Ford Engine
Set the basic ignition timing with the timing pin, distributor cam, and a simple test light.
Tools and Safety
This procedure sets the basic Model A ignition timing by locating the timing gear dimple and adjusting the distributor cam until the breaker points open at the right moment.
Before turning the engine or opening the distributor:
- Turn the ignition key off.
- Place the gear shift lever in neutral.
- Set the parking brake.
Have these items ready:
- Starting crank
- Feeler gauge
- Screwdriver for the distributor cam locking screw
- Test light with probe and ground lead
Set the Spark Lever
Move the spark lever on the steering column fully up. Fully up is the fully retarded position, and the timing adjustment is made with the spark fully retarded.
Check the Points and Rotor Gap
Before setting timing, make sure the breaker point contacts are clean and in good shape. Set the breaker point gap to 0.020 inch using a feeler gauge. Rotate the engine with the starting crank. Locate the high point of the distributor cam, loosen the point adjusting screw, adjust the gap until the feeler gauge slides through with slight drag, and then retighten the screw.
Also check the rotor gap to the distributor body contact points. The desired clearance is approximately 0.015 to 0.020 inch, but exact measurement matters less than consistency. Aim to make all four contacts as close to the same clearance as possible.
Uneven rotor-to-contact gaps can make cylinders fire differently, so consistency across all four contacts is the primary goal.
Find the Timing Dimple
- Unscrew the timing pin from the front timing gear cover.
- Insert the opposite end of the timing pin into the timing pin hole so the pointed end faces inward.
- Using the starting crank, very slowly turn the engine clockwise while pressing in on the timing pin. Please note: This is much easier to do with the spark plugs removed.
- Stop when the pin drops into the small dimple in the timing gear. This places number 1 piston at the timing position.
If you miss the dimple, keep turning the engine clockwise until it comes around again. Do not rotate the engine backward to find it.
Position the Distributor Cam
- Remove the distributor cap, distributor body, and rotor.
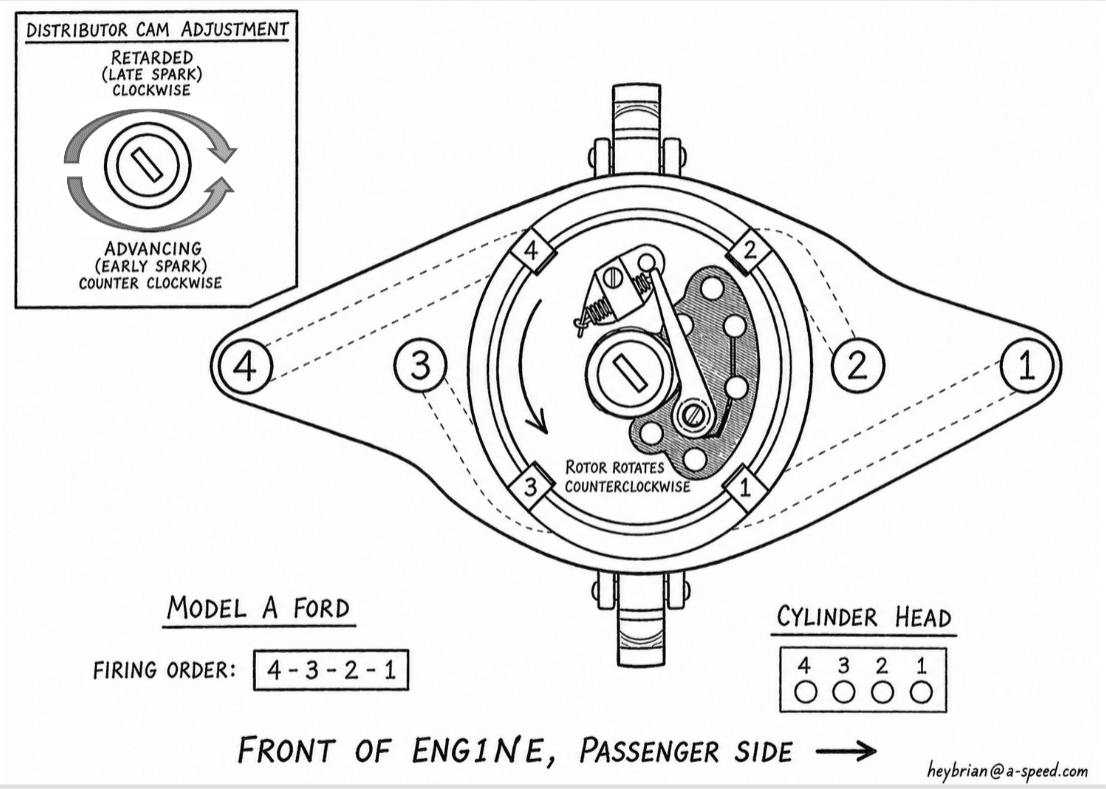
- Loosen the distributor cam locking screw only enough that the cam can be turned.
- Keep the engine on the timing dimple and keep the spark lever fully retarded.
Set the Points to Just Open
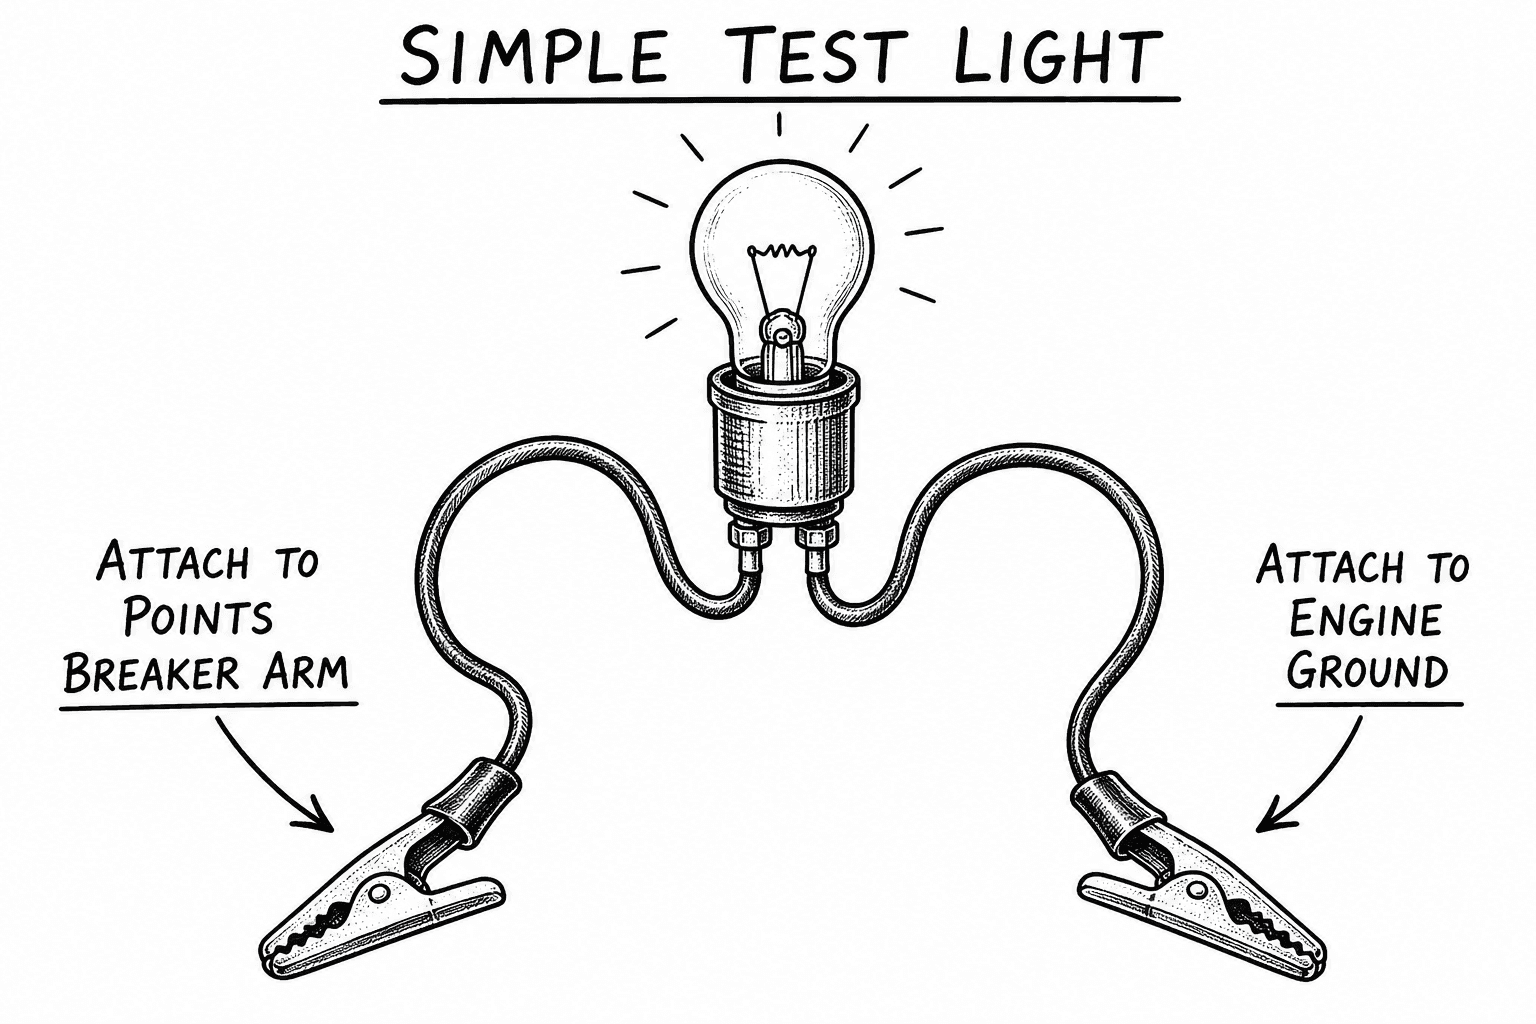
- Connect the test light between the breaker point arm and a clean engine ground.
- Turn the ignition switch on for this test-light step.
- Turn the distributor cam counterclockwise until the breaker points are fully open and the test light comes on.
- Slowly turn the cam clockwise until the points just close and the test light goes off.
The light going off marks the point where the contacts have just closed. From there, the points should just begin to open as the spark lever is advanced.
Tighten and Recheck
- Tighten the cam locking screw securely without allowing the cam to move.
- Recheck the setting with the engine still on the timing dimple and the spark lever fully retarded.
- Slowly pull the spark advance lever down. The test light should come on as the points open, typically when the lever is about three quarters of the way down.
If the light does not come on at the expected lever position, repeat the cam adjustment. Small cam movements make a noticeable difference.
Reassemble
- Turn the ignition switch off.
- Remove the test light.
- Reinstall the rotor, distributor body, and distributor cap.
- Remove the timing pin from the timing gear and reinstall it in the front cover in its normal position.
Start and Final Check
Start the engine with the spark lever fully retarded. After the engine starts, advance the spark lever two to three clicks until you hear the idle even out and slightly speed up. This will be your normal around town driving position.
If the engine kicks back, starts hard, pings, or feels weak after the adjustment, stop and recheck following the steps in this article.
If you are unsure at any point, ask an experienced Model A mechanic or local club member for help before running the car.
Related Resources
- How to Determine Your Model A Ford Rear-End Ratio → — Identify your Model A rear-end ratio with a simple crank pulley rolling test—no differential teardown required.
- How Accurate Is Your Model A Ford Speedometer? → — Learn why vintage speedometers drift and how to test yours against GPS for honest touring speeds.
- How to Calculate Model A Ford Engine RPM → — Understand the math behind MPH, tire size, and rear-end ratio—and see example RPM figures for real Model A setups.
- Understanding Model A Ford Overdrive Ratios → — Learn how overdrive affects RPM, cruising speed, and drivability—and how common Mitchell, Borg-Warner, RTS, and T5 conversions fit touring builds.
- How to Measure Tire Diameter for Accurate Model A Ford RPM Calculations → — Measure tire diameter the right way—direct and rolling methods, wear considerations, and why accurate sizing matters for A-Speed RPM on tour.
- A-Speed Features → — GPS speedometer, RPM calculator, and touring tools
- Help & FAQ → — Setup, drivetrain settings, and troubleshooting
- User Guide PDF → — Complete A-Speed reference for Model A owners